Data Science in Cybersecurity

Ibrahim Uruc Tarim

The Role of Data Science in CyberSecurity

Cybersecurity and data science are two sides of the same coin in today’s linked world, each enhancing the other’s skills in the pursuit of a safer digital environment. Cybersecurity has developed to take use of the predictive and analytical capabilities of Data Science, shifting away from the traditional concentration on protection measures like firewalls and antivirus software. Traditional cybersecurity solutions are frequently insufficient due to the expansion of complicated networks and an increase in endpoints. Data science can help with this. Data Science gives the capabilities to identify subtle trends and abnormalities that conventional approaches can miss by utilizing very complex machine learning algorithms, statistical models, and real-time analytics. With the use of these insights, cybersecurity may take a proactive approach rather of playing “catch-up.”

Therefore, the combination of cybersecurity with data science revolutionizes our approach to digital safety as a whole rather than merely adding a layer of defense.

I have selected to engage with the VERIS Community Database, a rich collection of confirmed cybersecurity events, for our investigation into this crucial junction of Data Science and Cybersecurity. This dataset serves as an excellent canvas for our inquiry since it provides a rich tapestry of variables spanning from assault kinds to their practical ramifications. The database allows for a multidimensional picture of cybersecurity risks since it is both broad in reach and complex in its classification. My decision to use this dataset was influenced by its capacity to offer the fine information required for sophisticated analyses as well as by its applicability in the current cybersecurity conversation.

Setting the Stage: Initial Exploration with a Preliminary Data Breaches Dataset.

Before diving into the analysis of the extensive VERIS database, which boasts an overwhelming 8,539 entries and 2,347 features, I find it essential to introduce another dataset. This preliminary dataset is focused on the biggest data breaches and hacks in recent years. The purpose of using this introductory dataset is twofold: First, it will help to build a foundational understanding of the types of security incidents that are most prevalent. Second, it offers a more manageable size and complexity, which makes it an excellent starting point for initial exploration and analysis. This will set the stage for the more in-depth examination of the VERIS database, allowing us to draw more nuanced conclusions and develop more sophisticated models.

breaches_df <- read.csv("breaches.csv")
str(breaches_df)
'data.frame':   418 obs. of  16 variables:
 $ organisation     : chr  "visualisation here: https://informationisbeautiful.net/visualizations/worlds-biggest-data-breaches-hacks/\npink = new" "Plex" "Twitter" "Shanghai Police" ...
 $ alternative.name : chr  "" "" "" "" ...
 $ records.lost     : chr  "(use 3m, 4m, 5m or 10m to approximate unknown figures) " "15,000,000" "5,400,000" "500,000,000" ...
 $ year             : chr  "year story broke" "2022" "2021" "2022" ...
 $ date             : chr  "" "Aug 2022" "Dec 2021" "Jul 2022" ...
 $ story            : chr  "" "Intruders access password data, usernames, and emails for at least half of its 30 million users." "Zero day vulnerability allowed a threat actor to create profiles of 5.4 million Twitter users inc. a verified p"| __truncated__ "A database containing records of over a billion Chinese civilians – allegedly stolen from the Shanghai Police. "| __truncated__ ...
 $ sector           : chr  "web\nhealthcare\napp\nretail\ngaming\ntransport\nfinancial\ntech\ngovernment\ntelecoms\nlegal\nmedia\nacademic\"| __truncated__ "web " "web" "financial" ...
 $ method           : chr  "poor security\nhacked\noops!\nlost device \ninside job" "hacked" "hacked" "hacked" ...
 $ interesting.story: chr  "" "" "" "" ...
 $ data.sensitivity : chr  "1. Just email address/Online information \n2 SSN/Personal details \n3 Credit card information \n4 Health & othe"| __truncated__ "1" "2" "5" ...
 $ displayed.records: chr  "=IF(C3>100000000,C3,\")" "" "" "\"one billion\"" ...
 $ X                : logi  NA NA NA NA NA NA ...
 $ source.name      : chr  "" "Ars technica" "Bleeping Computer" "The Register" ...
 $ X1st.source.link : chr  "" "https://arstechnica.com/information-technology/2022/08/plex-imposes-password-reset-after-hackers-steal-data-for"| __truncated__ "https://www.bleepingcomputer.com/news/security/twitter-confirms-zero-day-used-to-expose-data-of-54-million-accounts/" "https://www.theregister.com/2022/07/05/shanghai_police_database_for_sell/" ...
 $ X2nd.source.link : chr  "" "" "" "" ...
 $ ID               : int  NA 418 419 420 421 417 416 415 414 413 ...

Initial Data Cleaning

Cleaned and structured the data by standardizing column names, dropping irrelevant rows and columns, and converting key columns to numeric data types. Also standardized the ‘Method’ field to ensure consistency for future analyses.

# Strip leading and trailing whitespaces from column names:
colnames(breaches_df) <- str_trim(colnames(breaches_df))

# Renaming some columns:
breaches_df <- rename(breaches_df,
                      Organization = organisation,
                      "Alternative Name" = alternative.name,
                      "Records Lost" = records.lost,
                      Year = year,
                      Date = date,
                      Story = story,
                      Sector = sector,
                      Method = method,
                      "Interesting Story" = interesting.story,
                      "Data Sensitivity" = data.sensitivity,
                      "Displayed Records" = displayed.records,
                      "Source Name" = source.name,
                      "1st Source Link" = X1st.source.link,
                      "2nd Source Link" = X2nd.source.link,
                      ID = ID)
# Dropping first row and the unnecessary column
breaches_df <- breaches_df %>% 
  slice(-1) %>% 
  select(-X)

# Converting 'Year' and 'Records Lost' columns to numeric, keeping NA values:
breaches_df$Year <- as.numeric(breaches_df$Year)
breaches_df$`Records Lost` <- as.numeric(gsub(",", "", breaches_df$`Records Lost`))

# Checking for NAs or other non-numeric values
summary(breaches_df$`Records Lost`)
     Min.   1st Qu.    Median      Mean   3rd Qu.      Max. 
       30    500000   3100000  34387245  18218203 700000000 
breaches_df$Method <- tolower(stringr::str_trim(breaches_df$Method))
table(breaches_df$Method)

       hacked    inside job   lost device         oops! poor security 
          274            20            48            22            53 
breaches_df <- breaches_df %>%
  mutate(Sector = trimws(Sector)) %>%
  mutate(Sector = ifelse(Sector == "finance", "financial", Sector))

unique(breaches_df$Sector)
 [1] "web"                  "financial"            "government"          
 [4] "tech"                 "retail"               "NGO"                 
 [7] "misc"                 "transport"            "legal"               
[10] "gaming"               "telecoms"             "app"                 
[13] "health"               "misc, health"         "tech, health"        
[16] "academic"             "tech, app"            "web, tech"           
[19] "tech, web"            "government, health"   "web, military"       
[22] "tech, retail"         "military"             "military, health"    
[25] "web, gaming"          "government, military"
glimpse(breaches_df)
Rows: 417
Columns: 15
$ Organization        <chr> "Plex", "Twitter", "Shanghai Police", "City of Ama…
$ `Alternative Name`  <chr> "", "", "", "", "", "", "", "", "", "", "", "", ""…
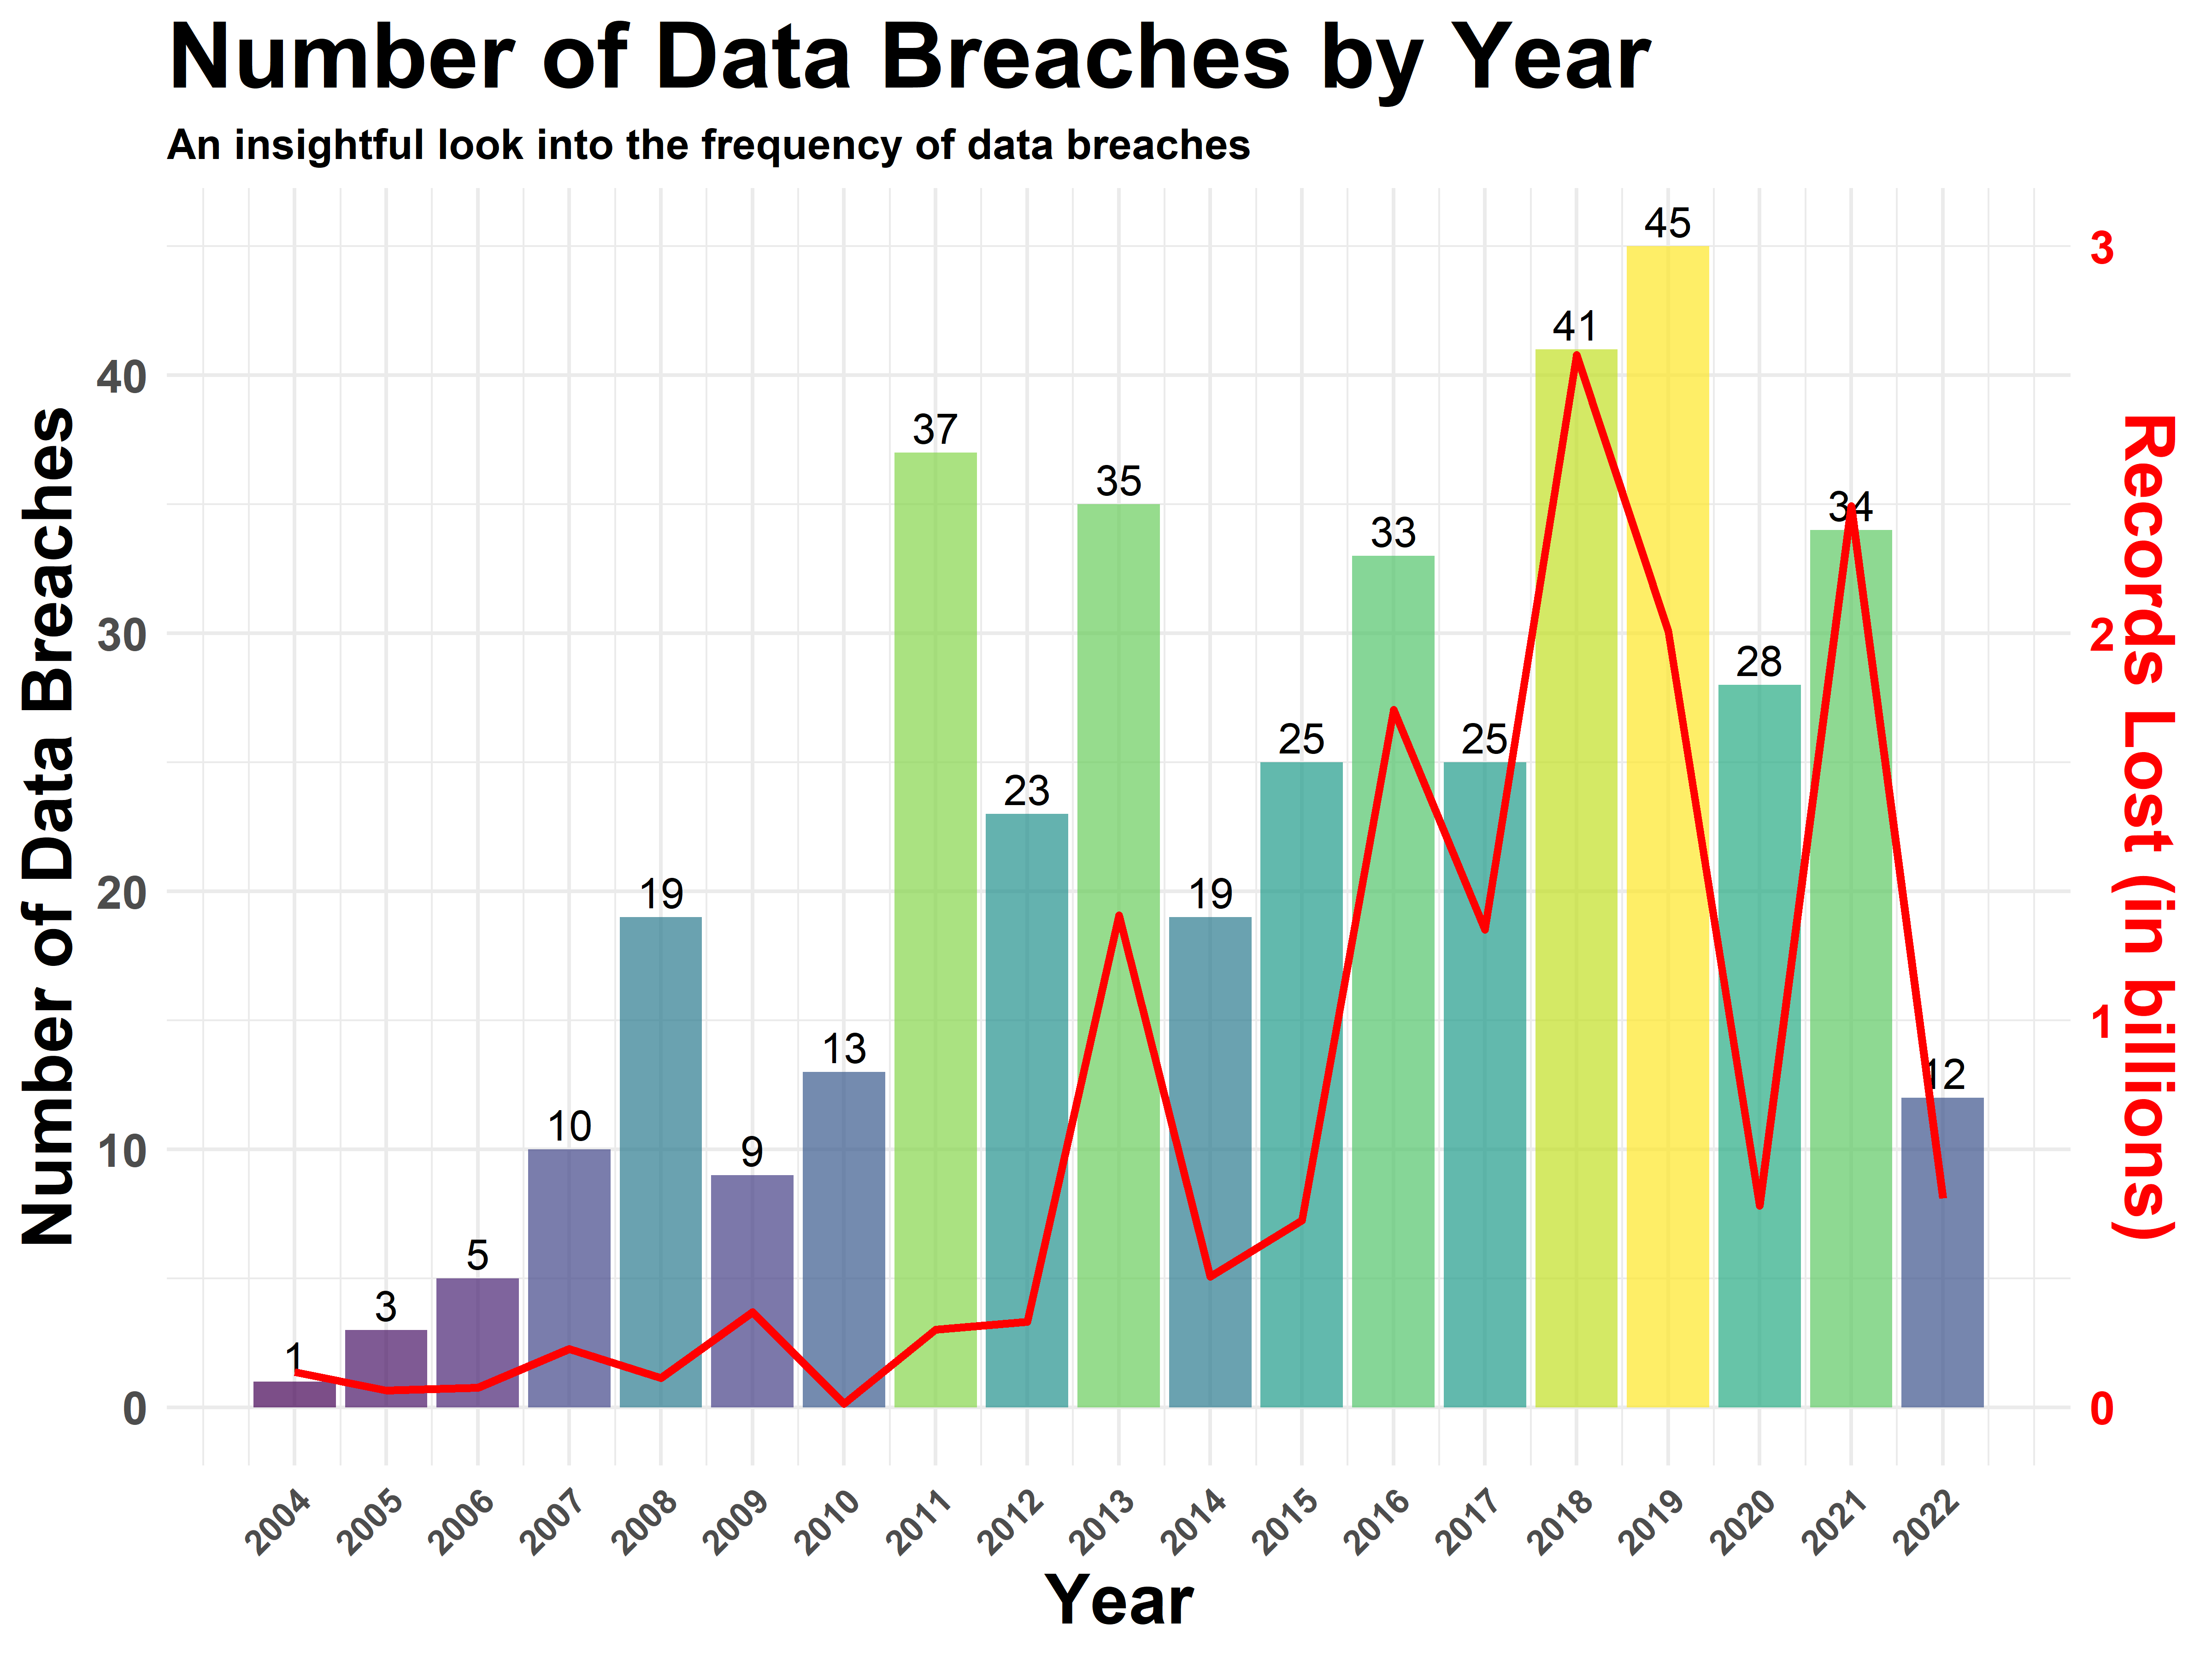
$ `Records Lost`      <dbl> 15000000, 5400000, 500000000, 500000, 800000, 5000…
$ Year                <dbl> 2022, 2021, 2022, 2022, 2022, 2022, 2022, 2022, 20…
$ Date                <chr> "Aug 2022", "Dec 2021", "Jul 2022", "Jun 2022", "M…
$ Story               <chr> "Intruders access password data, usernames, and em…
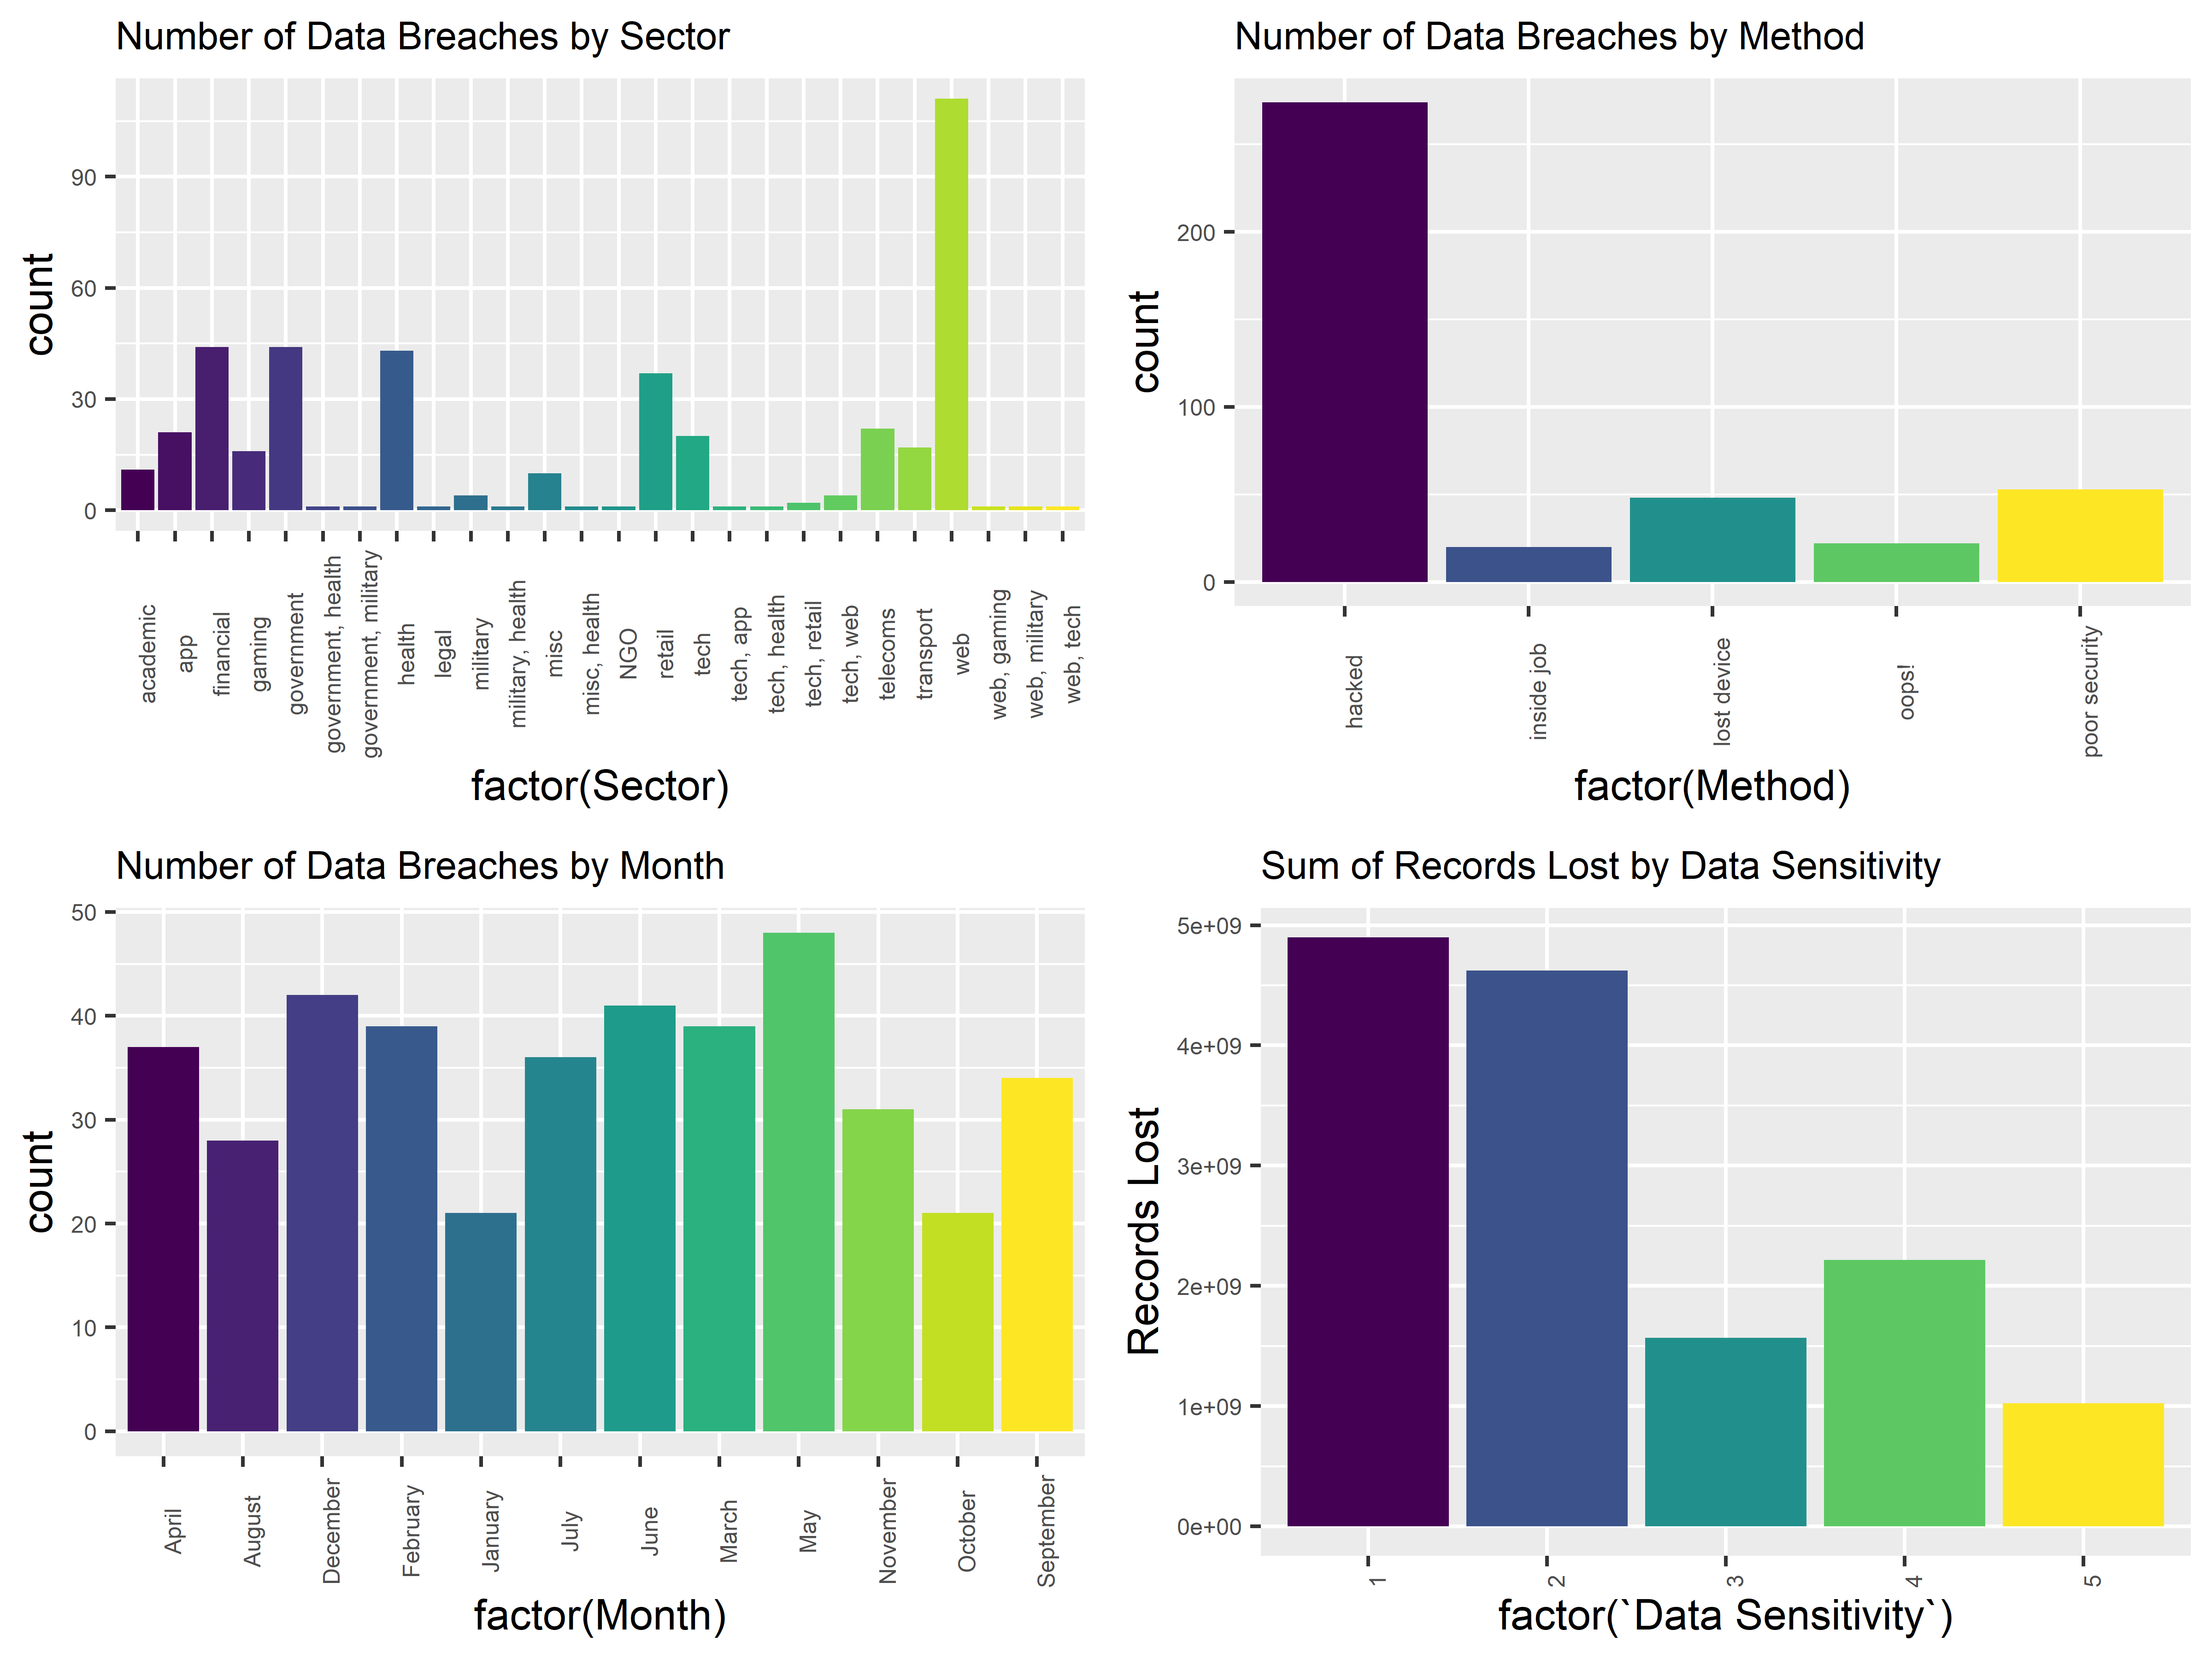
$ Sector              <chr> "web", "web", "financial", "government", "financia…
$ Method              <chr> "hacked", "hacked", "hacked", "oops!", "inside job…
$ `Interesting Story` <chr> "", "", "", "", "y", "", "", "", "", "", "", "", "…
$ `Data Sensitivity`  <chr> "1", "2", "5", "3", "1", "2", "1", "3", "3", "3", …
$ `Displayed Records` <chr> "", "", "\"one billion\"", "", "", "", "", "", "19…
$ `Source Name`       <chr> "Ars technica", "Bleeping Computer", "The Register…
$ `1st Source Link`   <chr> "https://arstechnica.com/information-technology/20…
$ `2nd Source Link`   <chr> "", "", "", "", "", "", "", "", "", "", "", "", ""…
$ ID                  <int> 418, 419, 420, 421, 417, 416, 415, 414, 413, 412, …

Data Visualization 1

Overview of Data Breaches: Sector, Method, Timing, and Data Sensitivity

  • Number of Data Breaches by Sector

The first visualization offers a comprehensive view of the data breaches organized by different sectors. This graph is pivotal in understanding which industries are most vulnerable to data breaches. For decision-makers in these sectors, this graph serves as an urgent call to improve cybersecurity measures.

  • Number of Data Breaches by Method

Understanding the method of data breach is equally important for preventative action. The second graph categorizes breaches by the method used to carry them out. This can guide cybersecurity analysts in tailoring their defenses against the most common types of attacks.

  • Number of Data Breaches by Month

Temporal patterns can also be insightful. The third graph displays the number of data breaches by month. If there’s a recurring seasonal trend, organizations could potentially increase their cybersecurity measures during more vulnerable periods.

  • Sum of Records Lost by Data Sensitivity

This chart uncovers the gravity of data breaches in terms of data sensitivity. From email addresses to full personal details, the graph categorizes the breaches based on what type of information was exposed. Understanding the magnitude of sensitive data loss is crucial for both consumers and businesses.

breaches_df$Date <- trimws(breaches_df$Date)
breachx_df <- breaches_df

# Preprocess data
breachx_df$Date <- as.Date(paste("01", breachx_df$Date), format="%d %b %Y")
breachx_df$Month <- format(breachx_df$Date, "%B")


# Plot 1: Number of Data Breaches by Sector
g1 <- ggplot(breachx_df, aes(x=factor(Sector), fill=factor(Sector))) +
  geom_bar() +
  scale_fill_viridis(discrete = TRUE) +
  theme(axis.text.x = element_text(angle = 90, size = 6),
        axis.text.y = element_text(size = 6),
        plot.title = element_text(size = 10),
        legend.position="none") +
  ggtitle("Number of Data Breaches by Sector")

# Plot 2: Number of Data Breaches by Method
g2 <- ggplot(breachx_df, aes(x=factor(Method), fill=factor(Method))) +
  geom_bar() +
  scale_fill_viridis(discrete = TRUE) +
  theme(axis.text.x = element_text(angle = 90, size = 6),
        axis.text.y = element_text(size = 6),
        plot.title = element_text(size = 10),
        legend.position="none") +
  ggtitle("Number of Data Breaches by Method")

# Plot 3: Number of Data Breaches by Month
g3 <- ggplot(breachx_df, aes(x=factor(Month), fill=factor(Month))) +
  geom_bar() +
  scale_fill_viridis(discrete = TRUE) +
  theme(axis.text.x = element_text(angle = 90, size = 6),
        axis.text.y = element_text(size = 6),
        plot.title = element_text(size = 10),
        legend.position="none") +
  ggtitle("Number of Data Breaches by Month")

# Plot 4: Sum of Records Lost by Data Sensitivity
filtered_df <- subset(breachx_df, !is.na(`Data Sensitivity`) & `Data Sensitivity` != "")
g4 <- ggplot(filtered_df, aes(x=factor(`Data Sensitivity`), y=`Records Lost`, fill=factor(`Data Sensitivity`))) +
  geom_bar(stat="identity") +
  scale_fill_viridis(discrete = TRUE) +
  theme(axis.text.x = element_text(angle = 90, size = 6),
        axis.text.y = element_text(size = 6),
        plot.title = element_text(size = 10),
        legend.position="none") +
  ggtitle("Sum of Records Lost by Data Sensitivity")

# Arrange the plots
grid.arrange(g1, g2, g3, g4, ncol = 2)

Data Visualization 2

Top 100 Data Breaches: A Timeline of Impact Across Sectors

This interactive visual takes a comprehensive look at the top 100 data breaches, providing a timeline that spans across different sectors. The x-axis lists the organizations affected, while the y-axis indicates the year when the most recent data breach occurred for that organization. Each point on the plot represents a specific organization and is color-coded based on the sector to which it belongs. The size of the point corresponds to the total number of records lost, offering a quick way to gauge the severity of each breach.

The points are also interactive; hovering over them will provide additional information about the organization, the number of records lost, the year of the most recent data breach, and the sector involved. This multi-faceted representation provides a nuanced understanding of the scale, timing, and sectoral distribution of the top 100 data breaches.

breaches_df$Date <- trimws(breaches_df$Date)
# Create a copy of the original data
breaches_df_copy <- breaches_df

# Apply the date transformation to the copy
breaches_df_copy$Date <- as.Date(paste("01", breaches_df$Date), format="%d %b %Y")

breaches_dfa <- breaches_df %>%
  group_by(Organization, Sector) %>%
  summarise(`Records Lost` = sum(`Records Lost`),
            Year = max(Year, na.rm = TRUE)) %>%
  ungroup() %>%
  arrange(desc(`Records Lost`)) %>%
  head(100)

# Preprocess the data
breaches_dfb <- breaches_dfa %>%
  mutate(`Records Lost` = round(`Records Lost`, 0)) %>%
  mutate(text = paste("Organization: ", Organization, "\nRecords Lost: ", `Records Lost`, "\nYear: ", Year, "\nSector: ", Sector, sep=""))

# Classic ggplot
p <- ggplot(breaches_dfb, aes(x = Organization, y = Year, size = `Records Lost`, color = Sector, text = text)) +
  geom_point(alpha=0.7) +
  scale_size(range = c(1.4, 19), name="Records Lost") +
  scale_color_viridis(discrete = TRUE, guide = FALSE) +
  theme_minimal() +
  theme(legend.position="none",
        axis.text.x=element_blank(),
        axis.ticks.x=element_blank()) +
  ylab("Year")

# Turn ggplot interactive with plotly
pp <- ggplotly(p, tooltip="text", width=700, height=525)
pp

Exploring the Intricacies of Data Breaches: A Sunburst View

This sunburst chart provides an insightful perspective on the landscape of data breaches. At the core of the visualization, we have methods of data breaches, such as hacking, accidental exposure, and more. Radiating from the center, the chart shows various organizations that have fallen victim to these methods, their extent depicted by the volume of records lost. By allowing us to explore data breaches by both method and organization in a single view, this sunburst chart offers a multifaceted understanding of the vulnerabilities that persist in different sectors.

# Create a dataframe for Methods, group by method and take top 20 based on records lost
breaches_df_copy2 <- breaches_df
df_methods_top <- breaches_df_copy2 %>% 
  group_by(Method) %>%
  summarise(Records_Lost = sum(`Records Lost`)) %>%
  arrange(desc(Records_Lost)) %>%
  head(20) %>%
  mutate(ID = paste("Method-", Method),
         parent = NA,
         label = Method)

# Filter the original data to include only these top 20 Methods
breaches_df_filtered <- breaches_df_copy2 %>% 
  filter(Method %in% df_methods_top$Method)

# Create a new column translating data sensitivity numbers to descriptive text
breaches_df_filtered <- breaches_df_filtered %>%
  mutate(Sensitivity_Label = case_when(
    `Data Sensitivity` == 1 ~ "Just email address/Online information",
    `Data Sensitivity` == 2 ~ "SSN/Personal details",
    `Data Sensitivity` == 3 ~ "Credit card information",
    `Data Sensitivity` == 4 ~ "Health & other personal records",
    `Data Sensitivity` == 5 ~ "Full details",
    TRUE ~ "Unknown"
  ))

# Create a dataframe for Organizations linked to these top 20 Methods
df_organizations <- breaches_df_filtered %>% 
  group_by(Method, Organization) %>%
  summarise(Records_Lost = sum(`Records Lost`), 
            Sensitivity_Label = first(Sensitivity_Label)) %>%  
  mutate(ID = paste("Org-", Organization),
         parent = paste("Method-", Method),
         label = Organization,
         hover_text = paste("Organization: ", Organization, "<br>Records Lost: ", Records_Lost, "<br>Data Sensitivity: ", Sensitivity_Label))

# Combine the two dataframes
df_sunburst <- bind_rows(df_methods_top, df_organizations)

# Create the sunburst chart
fig <- plot_ly(
  data = df_sunburst, 
  ids = ~ID, 
  labels = ~label, 
  values = ~Records_Lost, 
  parents = ~parent, 
  type = 'sunburst', 
  branchvalues = 'total',
  hoverinfo = 'text',
  hovertext = ~hover_text
) %>%
  layout(width = 700, height = 525)

fig

Top 20 ‘Interesting’ Data Breach Stories by Records Lost (Interactive Treemap)

Last but not least, our interactive treemap hones in on the ‘interesting’ stories behind the data breaches. This interactive tool not only quantifies the number of records lost but also lets you explore the narrative behind each breach. Just click on an organization to reveal the story behind its data breach.

This is particularly useful for cybersecurity analysts who may want to study these breaches in-depth to understand the various dynamics involved and to find new ways to prevent similar incidents.

# Filter out only 'interesting' stories
interesting_stories <- subset(breachx_df, `Interesting Story` == "y")

# Sort them by 'Records Lost' and take the top 10
top_20_interesting <- head(interesting_stories[order(-interesting_stories$`Records Lost`), ], 20)

# Function to insert line breaks after a certain number of characters
insert_breaks <- function(text, break_after = 50) {
  words <- unlist(strsplit(text, " "))
  output <- ''
  len <- 0
  for (word in words) {
    len <- len + nchar(word) + 1
    if (len > break_after) {
      output <- paste0(output, "<br>", word, " ")
      len <- nchar(word) + 1
    } else {
      output <- paste0(output, word, " ")
    }
  }
  return(trimws(output))
}

# Apply the function to the Story column
top_20_interesting$Formatted_Story <- sapply(top_20_interesting$Story, insert_breaks, break_after = 50)

top_20_interesting$sensitivity_label <- factor(top_20_interesting$`Data Sensitivity`,
                                               levels = c(1, 2, 3, 4, 5),
                                               labels = c("Just email address/Online information",
                                                          "SSN/Personal details",
                                                          "Credit card information",
                                                          "Health & other personal records",
                                                          "Full details"))

fig <- plot_ly(
  ids = top_20_interesting$Organization,
  labels = top_20_interesting$Organization,
  parents = '',
  values = top_20_interesting$`Records Lost`,
  customdata = top_20_interesting$Story,
  type = 'treemap',
  textinfo = "label+value"
) %>% layout(
  width = 700,
  height = 525,
  hovermode = "closest"
) %>% add_trace(
  hoverinfo = "text",
  hovertext = ~paste("Organization: ", top_20_interesting$Organization, "<br>",
                     "Date: ", format(top_20_interesting$Date, "%B %d, %Y"), "<br>",
                     "Data Sensitivity: ", top_20_interesting$sensitivity_label, "<br>",
                     "Story: ", stringr::str_wrap(top_20_interesting$Story, 50))
)

fig

Going Forward

After setting the stage with an initial dataset on major data breaches, we’re ready to dive deeper into the more detailed VERIS database. Think of VERIS as our roadmap for this detailed journey. It’s carefully divided into five main areas: Incident Tracking, Victim Demographics, Incident Description, Discovery & Response, and Impact Assessment. These sections give us a full picture of each security incident, beyond just the basic facts.

We’ll dig into each of these five areas to give you clear, useful insights. For example, in the Incident Tracking section, we’ll look at the timeline of events for each case. In Victim Demographics, we’ll find out who is most often targeted. The Incident Description will tell us how the attackers carried out their plans. Discovery & Response will show how each breach was found and handled, and Impact Assessment will tell us what the damage was, both in terms of money and reputation.

References

  • https://verisframework.org/index.html
  • https://www.kaggle.com/datasets/joebeachcapital/worlds-biggest-data-breaches-and-hacks